Now the last thing we will need before our first Component is done, is to add the code that will render the MyBlog Component. However, before we start adding our rendering code, let us see how the Seeems.Framework handles the default rendering.
As you can see from the picture, the framework does a simple default rendering by displaying the name of the Component, of course we want it to display the values of its properties so we will have to write our own rendering code for our Component, which is done by overriding the Render(...) method. For this Component we will simply add the content of the properties as plain text and separate them with a linebreak.
...public override void Render(System.Web.UI.Control container, RenderContext context) {
  System.Web.UI.LiteralControl blogLiteral = new System.Web.UI.LiteralControl(_blogTitle);
  System.Web.UI.LiteralControl breakLiteral = new System.Web.UI.LiteralControl(" ");
  System.Web.UI.LiteralControl textLiteral = new System.Web.UI.LiteralControl(_text);
  container.Controls.Add(blogLiteral);
  container.Controls.Add(breakLiteral);
  container.Controls.Add(textLiteral);
}...
The container.Controls.Add(new LiteralControl(...); then adds the content of our two Properties to the website. Basically the System.Web.UI.Control is in charge of writing the HTML code for the site, while the RenderContext is used for sending different parameters needed for the rendering. Let us add some text in the BackOffice and see how the FrontEnd now renders our simple code.
And here is what it looks like FrontEnd...
As you can see our Component is now rendered with its caption followed by the linebreak and text content as described in our rendering code. Now if you were to try to edit our Component through the direct FrontEnd editing, you would see that this feature has to be implemented manually, so before we end this lesson let us enable FrontEnd editing. To do this we have to add our LiteralControls to the RenderFrontAttributes method by wrapping them in a HtmlGenericControl, this will give us the ability to manipulate the Component from the FrontEnd. In order to access the PropertyEditors of our two properties, we will need to add the attribute FrontEdit to our get/set methods, which gives us the following code.
... [FrontEdit] public string BlogTitle {...
}... [FrontEdit] public string Text {...
}...public override void Render(System.Web.UI.Control container, RenderContext context) {
  System.Web.UI.LiteralControl blogLiteral = new System.Web.UI.LiteralControl(_blogTitle);
  System.Web.UI.LiteralControl breakLiteral = new System.Web.UI.LiteralControl(" ");
  System.Web.UI.LiteralControl textLiteral = new System.Web.UI.LiteralControl(_text);
  System.Web.UI.HtmlControls.HtmlGenericControl wrapper = new System.Web.UI.HtmlControls.HtmlGenericControl("div");
  this.RenderFrontAttributes(wrapper);
  container.Controls.Add(wrapper);
  wrapper.Controls.Add(blogLiteral);
  wrapper.Controls.Add(breakLiteral);
  wrapper.Controls.Add(textLiteral);
}...
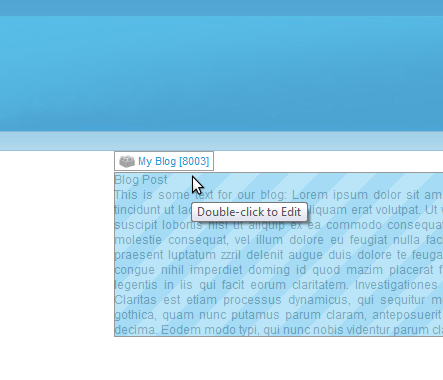
Now if we take a look at the Frontend, the Component will be highlighted if we hover over it for a while.

MyBlog FrontEnd highlight
As you can see the FrontEnd now allows us to edit both of our properties.
This completes the Component tutorial, below you will find the final code for our MyBlog Component
using System;
using Seeems.Framework;
using Seeems.Framework.UI;
namespace Seeems.Cms.Content { [Parent("Content")][Caption("My Blog")][Toolbox("Community")][System.ComponentModel.Description("This is a Blog Component")]
  public class MyBlog: SiteComponent {
    string _blogTitle = "Blog";
    string _text;
    [Caption("Blog Title")][System.ComponentModel.Description("The title of the MyBlog Component")][FrontEdit] public string BlogTitle {
      get {
        return _blogTitle;
      }
      set {
        _blogTitle = value;
      }
    }
    [PropertyEditor(typeof(Seeems.Framework.UI.Design.TextPropertyEditor))][System.ComponentModel.Description("This is the text of the blog.")]
    [Caption("Text")][FrontEdit] public string Text {
      get {
        _text;
      }
      set {
        _text = value;
      }
    }
    public override void Render(System.Web.UI.Control container, RenderContext context) {
      System.Web.UI.LiteralControl blogLiteral = new System.Web.UI.LiteralControl(_blogTitle);
      System.Web.UI.LiteralControl breakLiteral = new System.Web.UI.LiteralControl(" ");
      System.Web.UI.LiteralControl textLiteral = new System.Web.UI.LiteralControl(_text);
      System.Web.UI.HtmlControls.HtmlGenericControl wrapper = new System.Web.UI.HtmlControls.HtmlGenericControl("div");
      this.RenderFrontAttributes(wrapper);
      container.Controls.Add(wrapper);
      wrapper.Controls.Add(blogLiteral);
      wrapper.Controls.Add(breakLiteral);
      wrapper.Controls.Add(textLiteral);
    }
  }
}
What next?
Now you know the basics behind creating your own Component. Of course there is more to it than this initial tutorial both in terms of the possibilities in the back office and the front end, for instance you can add a custom icon to your new Component in the back office and likewise there's a whole API of the framework, which makes it easier for you to create interesting new Components. If you want to get acquainted with other constructs than the Component, we suggest that you take a look at the tutorial for creating a custom PropertyEditor as the next natural step in extending the SEEEMS Framework.